Cats love the outdoors, there’s no doubt about it! They adore running around, smelling the fresh air, and chasing anything that moves.
These days however, the great outdoors is getting a lot more dangerous for our feline friends.
Cars, roads, traps, poison, and even the occasional thief make it impossible for us to let out kitties outside without worrying.
Even Siamese cats that have never been outside before crave to run around in the grass. We can thank their natural instincts for that. Even though they’re more than happy to relax indoors, I know I tend to feel a little guilty saying “no.”
One day, while scrolling on Facebook, I came across a group called “Catio.” Curious, I clicked on the link, and it was there that all my prayers (and my Siameses’) were answered.
What is a catio?
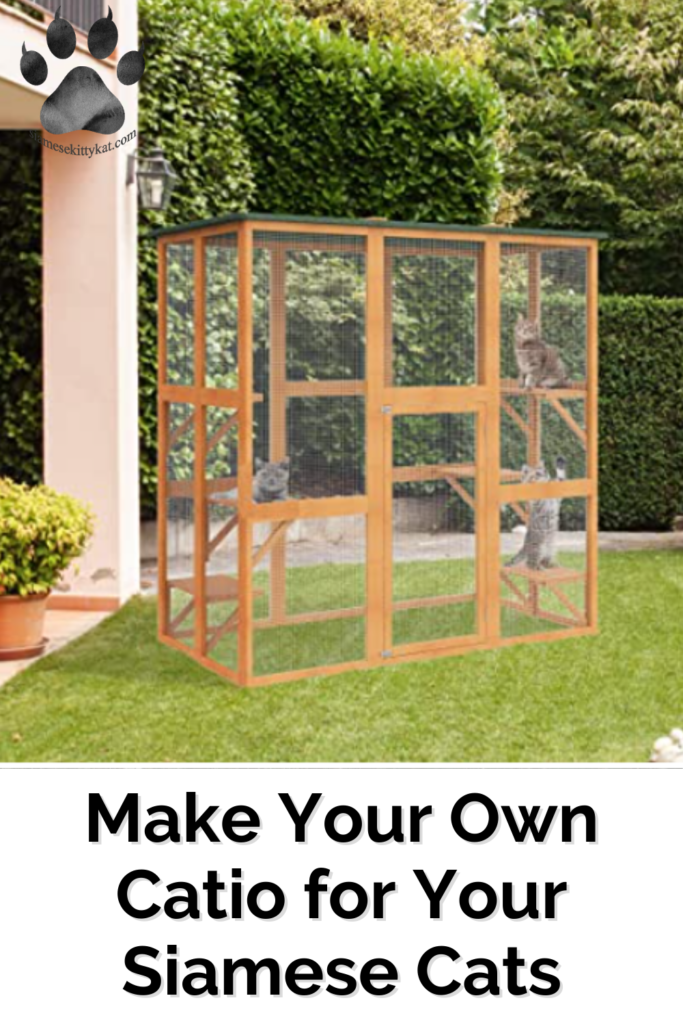
To put it simply, a catio is a patio for cats (cat patio – catio, smart right?) It is an outdoor enclosure, typically made from wood, to provide a safe and enriching space for your Siamese.
Here they can lay in the sun, get some fresh air, exercise, and watch the world go by. Not only do they ensure your cat doesn’t get harmed, but they also protect our little birdy friends from becoming your feline’s new plaything.
Catios come in all different shapes and sizes. Some are small and simple with a few perches and toys. Others are large enough to fit a horse, with perches, hidey holes, and ladders.
These catios are usually placed against the house near a window or cat flap. Some pet parents even go to the extent of building a tunnel from the house and into the enclosure.
7 Reasons to get a catio
There are many reasons why you should install a catio, aside from being able to say “My cat has his own patio.”
How to choose the perfect space for a catio

Since the whole point of making a catio is to provide an enriching environment for your kitty, it’s important you find a good place.
Before you go ahead with the build, consider these things:
What are the different types of catios?
The world of catios runs far and wide, and it’s not one shoe fits all. There are actually 5 different types of catios available.
What should I build my catio from?
You want your catio to last, so you should choose your materials carefully. To ensure it lasts through rain and shine, choose a weather-graded wood such as redwood or cedar. These are also pest-resistant.
You should also ensure the lumber you use is cat safe. Some plywoods are treated with arsenic, which can be a health risk to your kitty.
To make sure the catio is secure, you will need to buy a pet fencing that can keep your kitty in and other creatures out. Birds shouldn’t be able to fit through and cats shouldn’t be able to chew through.
Many people choose to concrete the catio posts into the ground to ensure they don’t move. However, this isn’t needed, and it’s actually better to place the catio on an elevated deck.
Placing it on decking decreases the chance of your Siamese contracting any ticks or fleas. You can also build a little barrier around the bottom of the catio from wood to stop animals from getting inside the enclosure.
For the roof, it’s a good idea to make it enclosed so your siamese can still use it while it’s raining or snowing.
The roof can be made from clear polycarbonate, metal, or shingle. You can add an open-style roof using the same mesh as you use for the inside of the catio, but I recommend making an enclosed roof.
Accessories for your catio
When I built my catio, my favorite part was decorating. I was so excited to fill it up with accessories and decor that I knew my Siamese kitties would love it.
Here are a few things I added into my catio:
7 Steps to building a catio

Since there are so many different catios out there, it’s really up to you which one fits your space and the personality of your Siamese. Below are 7 steps you’ll need to take when building your own catio.
Step 1 – The Design
You’ll need to choose or create your own design before you go ahead. Think if you want a window box, something basic, something fancy, or a freestanding catio.
You should take into account how much size you have available and what style will fit your space. You should also think about your cat and its personality.
Will they like a small catio, or do they need space to roam? Do they prefer sunbathing or hanging out in the shade?
If you’re building your own catio, costs soon begin to rack up. So, you should take into consideration your budget, unless you want something half-finished.
Step 2 – The Location
The space in which you build your catio should be flat and stable. If you’re building a wooden floor, ensure there are no trees or shrubs in the way.
Dirt floors are also fine, however, you should make sure there are no toxic plants in or around the space.
Step 3 – The Materials
The materials you use should be weather-graded to ensure they withstand the test of time. If the catio is made from unstable materials, this could become a danger to your cat and your family.
You should be able to find most of the materials you need at your local DIY store.
Step 4 – The Frame
Before you cut the wood, ensure you have the right dimensions. Measure them once, twice, three times before you cut!
According to the dimensions, cut the wood for the front and back of the catio. Drill two holes into the end of the wood boards, smaller than the screws you are using. The holes should be an inch away from the edges of the wood. For the sides of the catio, follow the same instructions.
Join everything together with the screws. Don’t be afraid to add more if needed – the more stable, the better!
To build the entrance, join three pieces of wood together and attach them to your selected side of the structure.
The mesh should go all the way around the sides of the catio, except the entrance. You can join the mesh to the wood using staples.
Note: Before you attach everything together, make sure there are no big objects that need putting inside the catio. For example, if you’re looking to place a large cat tree inside but you know it won’t fit through the door, you should put it in beforehand.
Step 5: The Roof
I recommend using plywood sheets as a roof for your catio. You can place these on top of the frame and secure them with screws.
Step 6: The Accessories
This is the part where you can get creative! Add shelves for climbing and sunbathing, perches for watching the birds, and lots of places to hide, especially out of the sun.
Step 7: The Finishing Touches
You’ve spent so much time, effort, and money on your fancy new catio – you may as well finish strong! Get all the nails hammered in and all the edges sanded.
Will my cat enjoy a catio?

The worst thing would be building your catio and your Siamese deciding they don’t like it. That’s why it’s important to have your cat’s personality in mind when building the catio.
If your Siamese is timid or shy, you should add some hiding spots so they can hide whenever they want.
Do senior cats like catios?
Cats of all ages can enjoy a catio. You don’t have to be the prime age of 3 to enjoy basking in the sun or watching some birds fly by. All you have to do is keep their physical condition in mind.
For example, if your Siamese has trouble jumping and climbing, you can insert ramps or ladders instead.
I have a scardy cat, will they be ok in a catio?
Sure! If your Siamese is a little bit skittish, all they need are some tunnels and hidey holes to feel safe. Even the most skittish cats love chilling out on some high perches to watch the world go by.
How long will it take for my Siamese to get used to a catio?
All cats have different personalities – that’s why we love them! From my experience, my Siamese cats took around 2 weeks to get used to the catio.
To begin with, they were a little bit skittish and unsure of the area. To get them used to it quicker, I added lots of toys and spaces for them to relax. I also added a chair inside the catio beforehand so I could relax with my kitties and get them used to the environment.
Don’t force your Siamese kitties into the catio. Let them come and go as they please. They will soon become adjusted to their new space!
Are catios worth it?
My Siamese cats absolutely adore their catio. Once they got used to being outside, it was almost impossible to get them in! Sure, it was an expensive project and it took lots of time, however, it was all worth it in my eyes.
There’s nothing better than a happy, enriched kitty!
Get your FREE Siamese Cat 2026 Printable Calendar

